How to use MitoPilot on the NOAA NMFS SENDA computing cluster
You will need an account to access the SEDNA computing cluster. Detailed instructions can be found here. Or contact Krista Nichols (krista.nichols@noaa.gov) for more information.
First time setup
For first time setup, you will need to create a Mamba environment for the MitoPilot dependencies Nextflow and Singularity. We will also include a version of R in this environment; there are some issues installing the pipeline with the cluster’s R module.
Log in to the NOAA NMFS VPN, then log in to SEDNA. If you’ve never used mamba on SEDNA before, run the following.
Let’s create the MitoPilot_deps mamba environment. This
may take a while.
mamba create --name MitoPilot_deps bioconda::nextflow conda-forge::singularity conda-forge::zlib conda-forge::r-base -yNote: Please ensure your mamba environment is named
MitoPilot_deps, case sensitive. Otherwise, RStudio server
may not be able to access the required dependencies.
You can now call nextflow and singularity
from anywhere on the cluster, as long as this
MitoPilot_deps environment is activated.
Installing MitoPilot
Time to install MitoPilot! Activate your new mamba environment and launch R.
In the new R session, run the following to install MitoPilot. It will take a while to install all of the necessary dependencies.
if (!requireNamespace("BiocManager", quietly = TRUE)) {
  install.packages("BiocManager")
  install.packages("remotes")
}
BiocManager::install("Smithsonian/MitoPilot")
If install was successful, you can exit the R session using
quit().
Updating MitoPilot
If you need to update MitoPilot, simply run the BiocManager
installation command again. If you would like to ensure that you’re
using the latest MitoPilot version, run
remove.packages("MitoPilot") prior to installation.
After updating MitoPilot, we recommend restarting R (in RStudio,
Session > Restart R or run .rs.restartR()) and then
reloading the package with library(MitoPilot).
We also recommend clearing your Singularity cache with
singularity cache clean to ensure you are using the latest
MitoPilot Singularity image.
Setting up RStudio server
Note: If you only need the MitoPilot GUI (not a full RStudio session), you can skip RStudio Server entirely and run the GUI headless over an SSH tunnel. See Headless GUI over an SSH tunnel in the Custom HPC vignette.
Next we need to set up RStudio server. The version of RStudio server
must match the R version in your MitoPilot_deps mamba
environment. You should be able to see the R version by running
mamba activate MitoPilot_deps;mamba list.
In a SEDNA terminal, run the following. It may take a few minutes to download and set up the Singularity image file.
# Make a directory to host R-studio.
mkdir -p ~/rstudio
cd ~/rstudio

# activate MitoPilot mamba environment
mamba activate MitoPilot_deps

# Pull R studio from singularity
# change version number if needed
singularity pull docker://rocker/rstudio:4.5.2

# additional setup
mkdir -p run var-lib-rstudio-server
printf 'provider=sqlite\ndirectory=/var/lib/rstudio-server\n' > database.conf
Now let’s make a helper script to launch RStudio server. Again, make
sure you’re setting Rstudio_version correctly.
# set up bin directory if it doesn't exist
mkdir ~/bin

# create helper script
cat > ~/bin/start-rstudio-server-MitoPilot <<'EOL'
#!/bin/bash
# script to start RStudio server
# and print instructions on how to connect

# modify to match your RStudio server version
Rstudio_version="4.5.2"

cd ~/rstudio
source ~/.bashrc

mamba activate MitoPilot_deps

# Assign yourself a port
PORT=$(shuf -i 8000-9000 -n 1)

HOST=$( hostname )

GREEN='\033[0;32m' # green ANSI
RED='\033[0;31m' # red ANSI
NC='\033[0m' # no color ANSI

echo ""
echo -e "${GREEN}TO ACCESS RSTUDIO SERVER${NC}"
echo "In a terminal on your local system, run the following command:"
echo "ssh -N -L 8787:${HOST}:${PORT} ${USER}@sedna.nwfsc2.noaa.gov"
echo ""
echo "Enter your password when prompted"
echo "If successful, nothing will happen"
echo "Then open http://localhost:8787 on a local web browser"
echo ""
echo -e "${RED}NOTE:${NC} This window and your local terminal session"
echo "must remain open in order to access the Rstudio server"
echo ""

# set Singularity temp dir, if needed
# if not set, Singularity will write to /tmp on the compute nodes
#mkdir -p "${HOME}/.singularity/temp"
#export SINGULARITY_TMPDIR="${HOME}/.singularity/temp"

singularity exec \
 --bind run:/run,var-lib-rstudio-server:/var/lib/rstudio-server,database.conf:/etc/rstudio/database.conf,${HOME}/.conda/envs/MitoPilot_deps/bin,${HOME}/.conda/envs/MitoPilot_deps/lib \
 --env APPEND_PATH="${HOME}/.conda/envs/MitoPilot_deps/bin:${HOME}/.conda/envs/MitoPilot_deps/lib" \
 rstudio_${Rstudio_version}.sif \
 rserver --www-address=0.0.0.0 --www-port=${PORT} --server-user=${USER}
EOL

# make script executable
chmod 755 ~/bin/start-rstudio-server-MitoPilot
Launching RStudio server
To launch RStudio server, first start an interactive session in SENDA. You won’t need much computing resources, since MitoPilot uses Nextflow to distribute the analyses.
Then run the following.
Follow the instructions to access your RStudio server session. They should look something like this.
TO ACCESS RSTUDIO SERVER
In a terminal on your local system, run the following command:
ssh -N -L 8787:node01.cluster:8377 dmacguigan@sedna.nwfsc2.noaa.gov

Enter your password when prompted
If successful, nothing will happen
Then open http://localhost:8787 on a local web browser

NOTE: This window and your local terminal session
must remain open in order to access the Rstudio server
Launching MitoPilot
Once you have opened the RStudio server session, run
library(MitoPilot) to load the package. You should see a
message about Nextflow if successful.
Want to learn how to use MitoPilot? Check out the MitoPilot workshop website.
Running MitoPilot Jobs
SEDNA does not currently support running Nextflow within the R Shiny GUI.
For a small number of samples, you could run Nextflow in an interactive session. However, this requires you to maintain an open connection to the cluster. For large datasets, there may be issues if the connection breaks while Nextflow is running.
Therefore, if you have a large number of samples to process (more than a few dozen), we recommend running the assemble and annotate MitoPilot modules as batch jobs.
First, initialize your new project and modify any desired parameters
using the GUI. Once ready, click UPDATE. A new window
should appear.
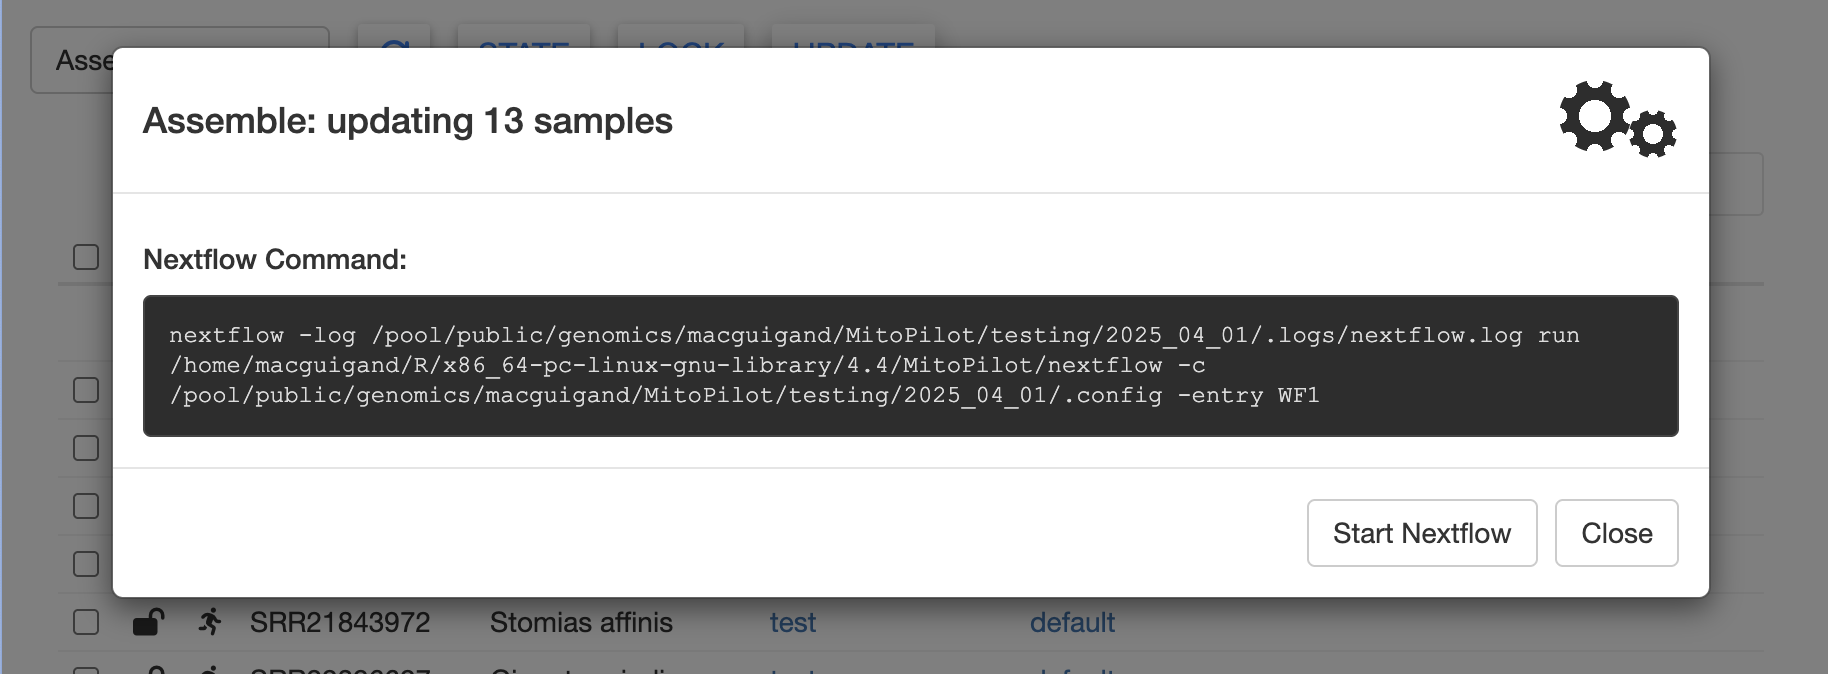
Rather than clicking the Run from App button, copy the
Nextflow command and create a submission script. We have provided a
template below. You may wish to modify the job name
(--job-name) and the output file names
(--output and --error).
#!/bin/bash
#SBATCH --job-name=MitoPilot_assembly # MODIFY THIS IF DESIRED
#SBATCH --output=MitoPilot_assembly.out # MODIFY THIS IF DESIRED
#SBATCH --error=MitoPilot_assembly.err # MODIFY THIS IF DESIRED
#SBATCH -p standard
#SBATCH -c 1
#SBATCH --mem=8G
#SBATCH -t 24:00:00

echo + `date` job $SLURM_JOB_NAME started in $SLURM_JOB_PARTITION with jobID=$SLURM_JOBID on $SLURM_JOB_NODELIST

source ~/.bashrc
mamba activate MitoPilot_deps

# MITOPILOT NEXTFLOW COMMAND, example below
nextflow -log /home/dmacguigan/MitoPilot/test/2025_1_2/.logs/nextflow.log run /home/dmacguigan/.conda/envs/MitoPilot_deps/lib/R/library/MitoPilot/nextflow -c /home/dmacguigan/MitoPilot/test/2025_1_2/.config -entry WF1

echo = `date` job $SLURM_JOB_NAME done
Move the submission script into your MitoPilot project directory (in
the above example,
/home/dmacguigan/MitoPilot/test/2025_1_2/). Then submit the
job using sbatch MY_SCRIPT_NAME.sh.
You can monitor the progress of this job using the
squeue command and by checking on the log files. Once the
job is done, you can relaunch the GUI to inspect the results. The same
approach can be used for the annotate module.